
by Adam Stroud
Before Tiger King, there was the Great St. Louis Bagel Scandal. You remember: internet fury was unleashed on the St. Louis region in 2019 over an image of bagels sliced like bread. The horror! Internet trolls everywhere, particularly from the East Coast, took shots at the idea of “St. Louis-style” bagels. Even Senate Minority Leader Chuck Schumer joined in on the fun to say “fuhgeddaboudit” to the vertical slicing technique. Luckily for us, the internet has moved on, so St. Louis is off the hook.
During the Bagel Scandal, the idea of actually making a homemade bagel was just a twinkle in my eye. I have tried baking various types of bread over the years, but I was never proud of any of them and I gave it up. Eventually, I came back to my copy of The New Artisan Bread in Five Minutes a Day (Hertzberg and Francois) and tried their bagel recipe. I had a blast mixing, forming, and boiling the dough, and the bagels were pretty good.
While discussing my bagel-filled weekend with PGAV Planners folks, Dave Cooperstein (Senior Creative Designer), said he had access to a killer recipe that I had to try if I was serious about bagels! So I put on my serious face, and Dave sent out a flurry of text messages to locate the coveted Petrofsky Bakery bagel recipe.
Through research, I discovered the Petrofsky family started a bakery in University City, Missouri in 1954. It was a destination for the Jewish community and bagel-lovers all over the St. Louis region. My gratitude goes out to the Petrofsky family and my friend Dave for giving me a delicious hobby that I get to share with my coworkers, friends, and family!
This recipe is not for the faint of heart, but I guarantee you won’t be disappointed with the results if you follow the steps. You can find the recipe here, hereinafter referred to as “The Recipe.” The Recipe doesn’t explain everything in detail, so I have compiled some notes based on my research and personal experience making bagels.
Ingredients: First, you need to get flour with a high protein content to make sure your bagels have a chewy consistency. Typically, a bag marked as “bread flour” will do the trick. I use King Arthur Unbleached Bread Flour when it is available.


You will note in the photos that I am using King Arthur whole wheat flour. This is due to the shortage of bread flour at my neighborhood grocers during the COVID-19 pandemic. My pandemic recipe uses one third whole wheat flour and two thirds all-purpose flour. You can also substitute the honey for sugar or maple syrup.
Weigh: Whether you use high-protein flour or all-purpose flour, you should weigh your ingredients with a kitchen scale if you can. Weighing the ingredients is more accurate than measuring cups and it will help ensure a consistent finished product.
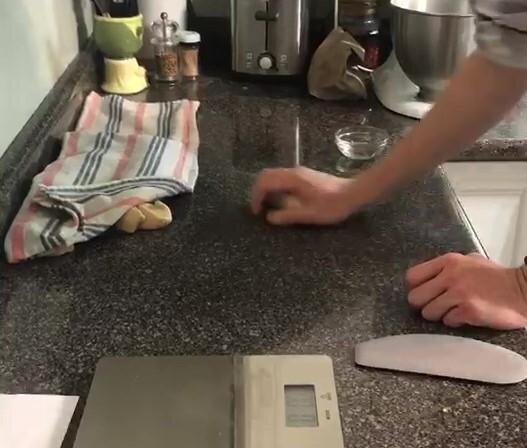
Knead and Divide: You can knead your dough by hand, or in a stand mixer, to develop the gluten. I found that kneading by hand after using the stand mixer, per The Recipe, helped to create a more elastic, smoother dough. After you let the kneaded dough rest a few minutes, you should roll the dough into a snake shape and divide it up into 3.5 to 3.8 ounce pieces. Again, the kitchen scale came in handy. You should end up with 10 pieces of dough. I usually double the recipe to make 20 bagels to make the effort worth it.


Roll the Dough: Get a moist towel to lay over the pieces as you form your bagels. You don’t want the dough to dry out while you are laboring! Form the rough shapes into balls of dough with no creases. Cup the dough and apply pressure with your palm while moving in a circular motion. If you wet the surface first with a drop of water, it will help the dough grab the slick surface while you are forming. If you have a more coarse or wooden surface, you probably won’t need the drop of water. This will take about 30 seconds for each ball and your arm should be tired.

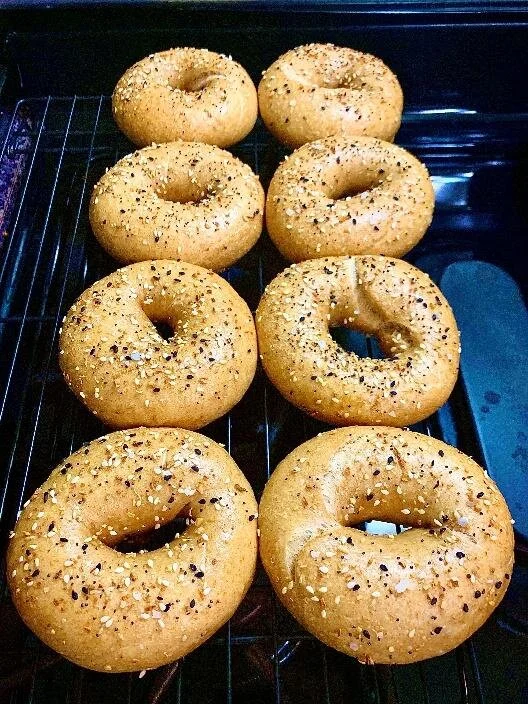
Shape: Now it’s time to form bagel shapes! There are two methods that I know of: 1) the roll method and 2) the punch method. The Recipe calls for the roll method. This video (skip to 4:10) can explain both methods better than I can. This time, I did half rolled and half punched. I think the rolled bagels end up firmer and chewier. They also end up taller than my punched bagels at the end. The punch method is a little faster and the bagels have an airier crumb (internal texture). In the photo below, the ones on the left are rolled--see the seam? The others are punched. Notice the smooth, seamless shape.


Rest: The bagels and your arm will need it! Cover the bagels and place them in the refrigerator overnight. I’ve let them rest for up to 24 hours. The Recipe uses chilled/ice water so that the dough doesn’t expand immediately. Slowing the rise and storing in the fridge overnight will allow the flavors to develop in the dough. The dough will not rise very much (see below).

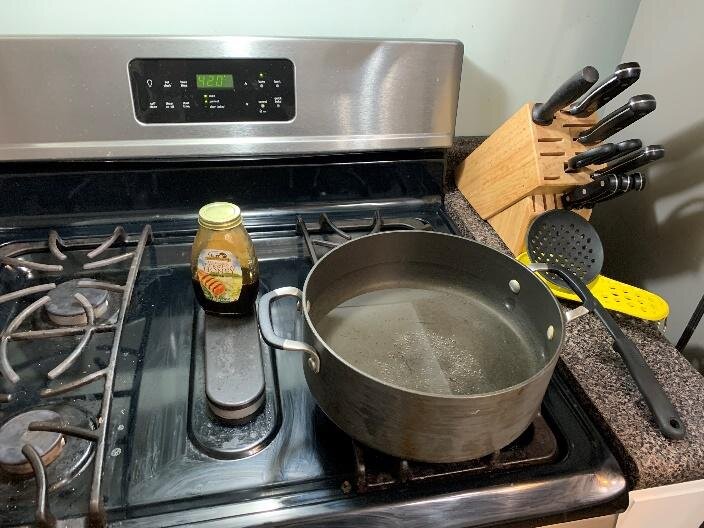
Boil: Boiling is essential! Boiling gives the bagels a chewy texture and it helps them expand a little before going in the oven. While the water comes to a boil, get out your toppings. I’ve had good results with “everything” seasoning, asiago cheese, and brown sugar and cinnamon, but you can use whatever you want!
After the bagels boil, brush the bagels with an egg wash so your toppings stick. I get in a rhythm of brushing and topping while the remaining bagels are boiling. Also, I’ve started topping both sides of the bagel.
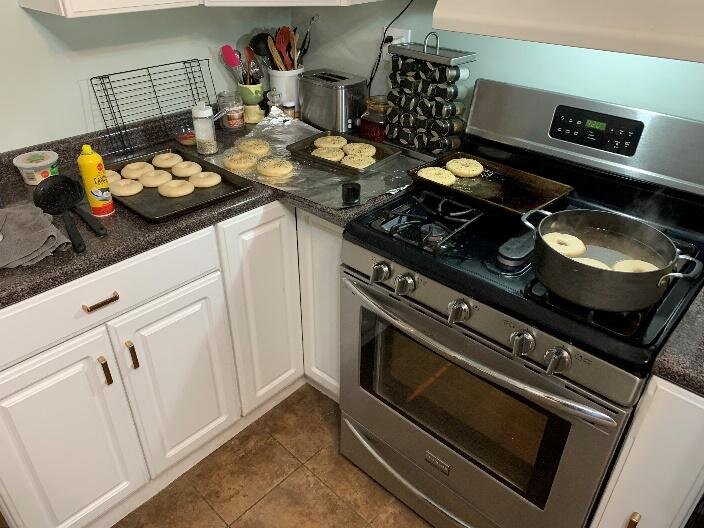
Bake: The rest of The Recipe is self-explanatory. I bake my bagels on a pan, but flip them halfway through. I start them upside down. The “bottom” is the side of the bagel that faces down while they are resting in the fridge. When The Recipe says to rotate the pan, I flip the bagels and rotate the pans. I read online that starting the bagels upside down will ensure the bottom of your bagel has a chance to rise before you flip. If it’s done right, you won’t be able to tell which is the top and which is the bottom. Of course, you can leave them untouched and follow The Recipe and still be fine.
I have so much fun forming, boiling, and baking bagels. I love researching different methods and incorporating new techniques into my recipe. Another benefit is having tasty bagels to eat every day! However, the best part of this has been to use a proven recipe from a famous bakery and share it with friends, coworkers, and family. They appreciate the effort as much as I do. Finally, I am proud of something I baked!
I hope you enjoy making these bagels as much as I do. And, how you slice them is entirely up to you.
